🛠 Ads.txt Generator
Create your Custom Ads.txt file for Blogger with a valid Publisher ID.
⚠️Enter a valid Publisher ID (e.g., pub-1234567890)
How to Use Custom ads.txt Generator for Blogger – Complete Guide for Monetizing Safely
In the dynamic world of digital marketing, earning through blogging is more accessible than ever. But with increasing opportunities comes the growing threat of ad fraud. That’s where the ads.txt file comes into play.
If you're a Blogger user monetizing your site with AdSense or any other network, adding a custom ads.txt file is a crucial step to ensure ad revenue protection and increase advertiser trust. In this complete guide, we’ll show you how to use a custom ads.txt generator for Blogger effectively.
🔍 What is ads.txt and Why is it Important?
The term ads.txt stands for Authorized Digital Sellers. It’s a publicly accessible text file placed on your website to declare which companies are authorized to sell your digital ad inventory.
👉 Key Benefits:
- Increases transparency in digital advertising.
- Reduces the risk of unauthorized ad sales and ad fraud.
- Helps advertisers know they are buying authentic impressions from approved publishers.
Without ads.txt, shady advertisers could impersonate your domain and steal your ad revenue.
🛠️ How to Use Custom ads.txt Generator in Blogger
Follow these easy steps to implement a custom ads.txt file on your Blogger site.
✅ Step 1: Log in to Your Blogger Account
Go to www.blogger.com and sign in using your Google account.
✅ Step 2: Select Your Blog
Choose the blog where you want to add the ads.txt file.
✅ Step 3: Go to “Settings”
From the left-hand menu in your Blogger dashboard, click on “Settings”.
✅ Step 4: Find the Monetization Section
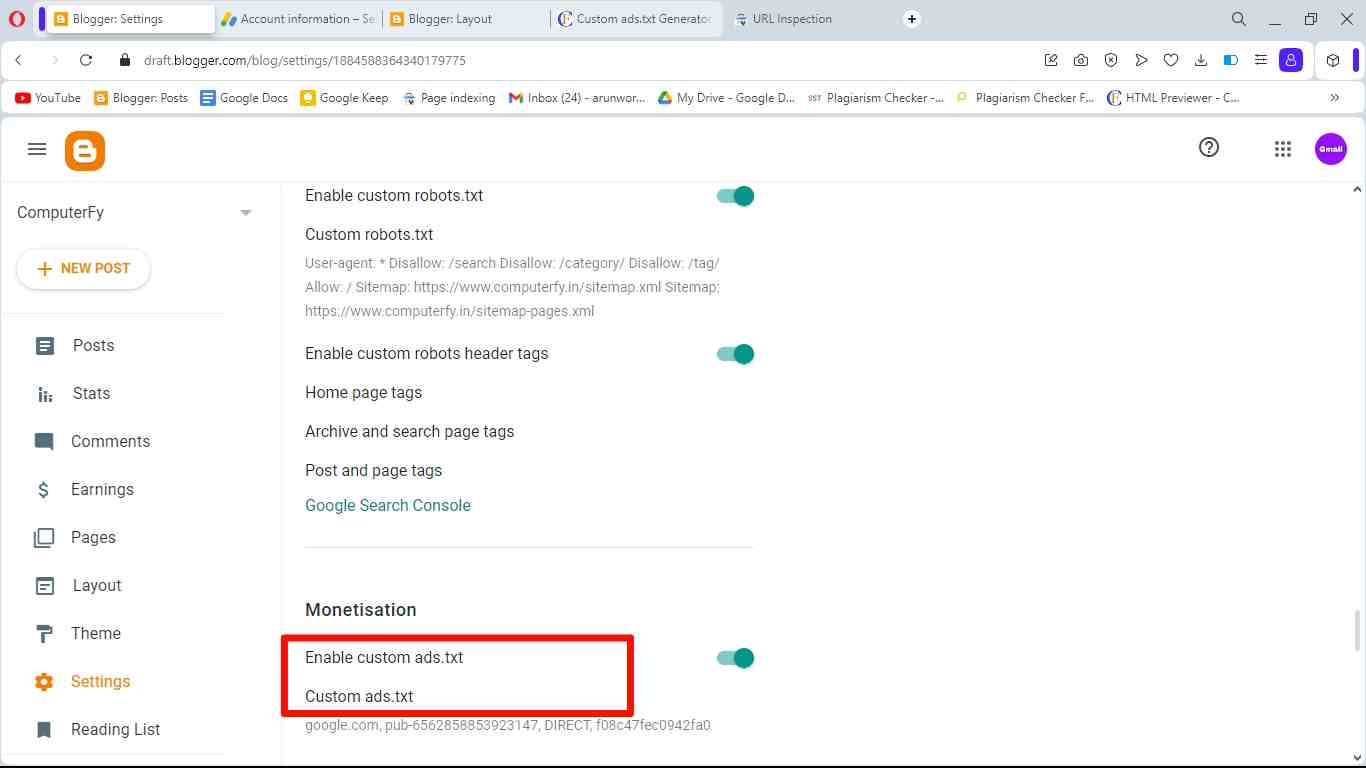
Scroll down to locate the Monetization section. Click on “Enable custom ads.txt”.
✅ Step 5: Generate Your Custom ads.txt Code
Use a custom ads.txt generator tool, like the one offered on AdSense or third-party sites, to generate your code. You’ll need your Publisher ID (something like pub-0000000000000000).
Example:
google.com, pub-0000000000000000, DIRECT, f08c47fec0942fa0
✅ Step 6: Paste the Code into Blogger
Paste the generated code into the Custom ads.txt content box in Blogger’s settings.
✅ Step 7: Save Settings
Click Save to apply the ads.txt file to your blog.
✅ How to Verify Your ads.txt File
🧪 Method 1: Manually Check
Visit your blog’s ads.txt URL:
yourblogname.blogspot.com/ads.txt
🧪 Method 2: Use Google AdSense ads.txt Checker
In your AdSense dashboard, you may see a warning under Sites > Alerts if ads.txt is not configured properly. Once added, this warning should disappear.
📈 Monitor Your Ad Performance
After implementing ads.txt:
- Wait 24–48 hours.
- Track earnings and impressions in your AdSense dashboard.
- Make sure ads are being served as usual.
✅ Conclusion
Using a custom ads.txt generator for Blogger is one of the easiest yet most powerful steps you can take to safeguard your ad revenue. It protects you from unauthorized resellers, increases trust with advertisers, and is crucial for long-term monetization success.
So don’t wait—log in to your Blogger dashboard and set up your ads.txt file today. A few minutes now can save your revenue in the long run.
❓ FAQs – Frequently Asked Questions
(1) What is an ads.txt file?
It’s a text file used by publishers to list all authorized advertising platforms allowed to sell their ad inventory.
(2) Is ads.txt required for AdSense?
While not mandatory, Google highly recommends implementing ads.txt to avoid revenue loss.
(3) Can I use multiple ad networks in ads.txt?
Yes, you can list multiple ad partners in one ads.txt file by adding new lines for each.
(4) Where do I find my AdSense Publisher ID?
Log in to your AdSense account, go to Account > Settings, and copy your Publisher ID.

(5) What is a Publisher ID, and where can I get?
A Publisher ID is a unique identifier associated with your Google AdSense account. You can find it in your AdSense account settings.
(6) How do I verify that my ads.txt file is set up correctly?
You can check the ads.txt file that it is set up correctly or not by typing "https://www.example.com/ads.txt" in the browser as shown in below image.

